As I'm Going Through the Photographic History of the Kitchen, I'm Getting Hives

With the house, we inherited a fully-functioning all-original kitchen (that we immediately dove headfirst into making sure was no longer fully-functioning).  Now it's in its awkward pre-teen phase where it's not quite this and not yet that.  I think Britney sang it best: http://www.youtube.com/watch?v=IlV7RhT6zHs (side note, this was most definitely my first time watching that video.)

I digress.  

The kitchen was a faux-wood finished wood canvas ready for us to tear apart like a honey badger.  


Riddle: Why did the home owners use wood, then paint over it and do a stain over that?  To match the nice oak cabinets with the wood paneled walls... which also had a faux-wood finish.


 Area for the fridge... and another, slightly smaller fridge?


Pantry, original oven and stove and more glorious faux-wood finished wood cabinets.


Looking in from the living room into the kitchen on the back side of the wall above.  

Looking at it for the first time I remember thinking, TEAR IT DOWN.  
More specifically: tear out the pantry and the wall between the living room and the kitchen and turn this galley kitchen into a much more inviting and open island kitchen.

Here is our to-do list (in no particular order) for the kitchen:
1.) Refinish cabinets (This involved lots of sanding and White Dove by Benjamin Moore)
2.) New hardware (GlideRite Stainless Steel from Amazon)
3.) Tear out the soffit to open up the space
4.) Take down the curtains
5.) Remove the contact paper from the cabinets and prime and paint the interiors
6.) Get a fridge
7.) Tear down the overhead cabinets over the peninsula
8.) New double oven and gas range
9.) Install gas line in kitchen (professional)
10.) GFCI outlets installed in the kitchen (professional)
11.) 220A electrical installed next to fridge to support double oven
12.) Tear out the pantry and take down the entire wall separating the living room and kitchen
13.) New counter tops
14.) More lighting fixture above sink from soffit to ceiling
15.) Get new pendant for above sink
16.) Build cabinet doors for the upper cabinets on either side of the sink (glass front)
17.) Texture the wall and paint over the wood panelling and space above the cabinets
18.) New countertops
19.) Remove popcorn ceiling
20.) New backsplash
21.) Paint island cabinets (Mysterious by Benjamin Moore)
22.) Build a cabinet for the double oven
23.) Build a new pantry 
24.) New lighting to replace the fluorescent one
25.) Pick out and buy pendant lights for above the island
26.) New faucet
27.) Figure out window covering for the window above the sink

The sad thing is that I'm sure I'm forgetting something.  And yet, look at how long that list is.  I didn't even include the fact that I want to tear down some of the wall that divides the kitchen from the front blue room (it's the wall between the two counters of the kitchen).

Here is what we've completed so far:
1.) Refinish cabinets (This involved lots of sanding and White Dove by Benjamin Moore)
2.) New hardware (GlideRite Stainless Steel from Amazon)
3.) Tear out the soffit to open up the space
4.) Take down the curtains
5.) Remove the contact paper from the cabinets and prime and paint the interiors
6.) Get a fridge
7.) Tear down the overhead cabinets over the peninsula
8.) New double oven and gas range These have been purchased from CL and are currently sitting in my garage
9.) Install gas line in kitchen (professional)
10.) GFCI outlets installed in the kitchen (professional)
11.) 220A electrical installed next to fridge to support double oven
12.) Tear out the pantry and take down the entire wall separating the living room and kitchen
13.) New counter tops
14.) More lighting fixture above sink from soffit to ceiling
15.) Get new pendant for above sink
16.) Build cabinet doors for the upper cabinets on either side of the sink (glass front)
17.) Texture the wall and paint over the wood panelling and space above the cabinets
18.) New countertops
19.) Remove popcorn ceiling
20.) New backsplash
21.) Paint island cabinets (Mysterious by Benjamin Moore)
22.) Build a cabinet for the double oven
23.) Build a new pantry 
24.) New lighting to replace the fluorescent one
25.) Pick out and buy pendant lights for above the island
26.) New faucet
27.) Figure out window covering for the window above the sink

I'll be posting on these slowly and will link back to them from here as I post date them.

As I was going through the pictures of the kitchen remodel, I felt my anxiety go up a few notches.  It's amazing how you can forget how much work goes into something once it's over, but how easily the feelings come back just through looking at pictures.

I'll leave you with this, my inspiration board of the things that will go into finishing out the kitchen (this is my Xanax).


(Don't) Fence Me In

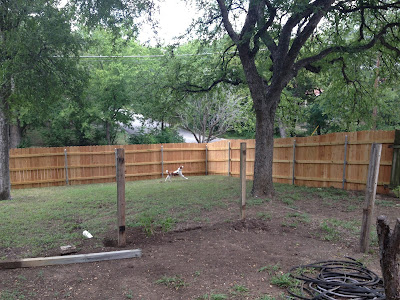
There are plenty of mysteries with this house, but the biggest one was why only enclose about 1/5 of the backyard with a fence?  It is such a beautiful lot, one with lots of large, established trees, so why not enjoy them and the view instead of having to walk out of the singular gate in order to get to most of it?

Magical.

Fences are expensive, but it was a necessary early expense due to the fact that Duke, the mud monster, could totally take down the existing fence.  So I set about researching contractors, getting bids and determining what I actually wanted for the backyard.

Early on, I fell in love with horizontal style fences.  You know, the ones that have the pickets running horizontally instead of vertically.  They are just gorgeous... for flat spaces.  Unfortunately (or fortunately, considering it's about 50% more expensive for horizontal fences), my lot has a bit of a steep slope to it.  A horizontal fence just wasn't in our cards.  

You'd think that'd it'd be easy to just find a fence company to build a fence.  It wasn't.  I talked to five contractors, had four come out to bid it and then had to negotiate the price.  Some things to consider if you are ever looking to build a fence (or have one built):
1.) What are the restrictions that the city imposes on your lot? (Have to be within easements.)  Can you have an 8ft/6ft tall fence?  (6 ft)  What are the easements? (5 ft neighbor to neighbor, 10 ft from street)
2.) Do you need a permit? (No)
3.) What type of wood? (Cedar)
4.) How do you want the posts set into the ground? (Wet cement)
5.) How many gates do you want? (3) Do you want a gate to be a double gate in order to allow construction equipment access? (Yes)
6.) How many cross bars do you want? (3)
7.) How do you want the pickets attached to the cross bars? (Galvanized nails, screws are a great option, but it is much more labor intensive)
8.) Do you want to have the fence follow the contours of the slope or do you want it to be straight across?

The last question is the only place we had issues with our contractor.  I did not understand what he was explaining to me, so I said "I want the fence to follow the contours of the slope," not knowing that this meant that the top could be all jagged-y (technical term) and not a nice even slanted line.  (You can see the issue towards the left of the picture where the fence kind of goes up a little bit).  You can also see Duke enjoying his backyard and the double gate.

Here is an after shot that includes the old fence before we took it down:

And the other side a little later on after we removed the wood panels and tried to take out the old posts:

Here's a full series of pictures of the backyard with the new fence:


We still need to move the old panels out of the way (the old fence wood we'll put to good use on other projects) and clean up the backyard (we're waiting for it to cool down before we start that project), but the fence is a fantastic improvement over the old one.

All in all, the project took two weeks due to rain delays.

Burglar Time

My dad's favorite game while I was growing up with Burger Time.  It's amazing.  You run across patties and lettuce and tomatoes to make, you guessed it, burgers.  All while being chased by salt and pepper.  It's kind of like real life, if... yeah, I can't make that work.  So let's just move on to the house, shall we?

During the inspection, we were told that the house is a death-trap.  No lie.  The combination of a breaker box that had been recalled due to "combusting and setting houses on fire" with the plethora of burglar bars (all with lost keys) securing the premises equaled certain death to the inspector.  These are things we had to remedy immediately or be prepared to perish in flames.  I chose the former.

They both turned out to be an easy fix.  The breaker box was a quick call to an Electrician I found on Yelp: Grayzer Electric.  He was friendly and asked me to send him the inspection report.  He came back with a quote the next day.  Easy to work with and his total cost was about half of what the inspector had thought it would be.  The best part: it only took one day.  

(Note: we were the only house on the street with burglar bars and we do not live in a bad neighborhood.  So we decided that they would come down.) The burglar bars required us to buy our first power tool at the house: a sawsall.  I think I'm in love.  In one afternoon, the house went from this:


To this:

Just by sawing off four little brackets on each window.

Yes, we still have a burglar bar'd front door as the actual door is hollow and that sh*t ain't safe.  Luckily, we have a key for that one, so it's less of a fire hazard.

We plan on painting the shutters black, coving over that metal scroll work (we'll try painting it black first) and tearing out that corner planter on the front porch.  Once we get a new front door, that also will be black.  There's a lot of landscaping we need to do to slope the yard (and potential water) away from the, but we'll leave that for winter when it's not a million degrees outside.

Go to Your Happy Place (Part One)

One gem of advice I got on how to have your relationship survive remodeling a house while living in it is: create an oasis of calm.  Get that room painted and clean and happy and set up so when everything else in the house is falling apart, you can grab the dog and hide out in the safety of your happy place.


The obvious choice was the master bed/bath, so we started there and tried to finish it before spending our first night at the new pad.

Let's revisit what the master suite looked like the day we took possession:


The door shown above is the door into the master bath.  That's the next stop on our lovely tour:


I think this must be how parents feel and look back at photos of their babies.  "She was so small!"  "I can't believe how much she's grown!" (enter other parental sayings here.)

Let's pretend that the master suite is Julia Roberts in Pretty Woman.  I wanted to make her go from this:
Would you want to sleep there?
To this:
Go ahead and put a ring on it.

Let's keep with this analogy.  I tore off all of the fabric - this meant the drapes (which we saved and now use as drop cloths), the shower curtains and the valence in the bathroom.  She got a good scrub down with a Mouse sander outfitted with a scrubbing pad and Clorox Cleaner:


Momma will be proud!

We also steam cleaned the carpet in the bedroom portion, scrubbed down the tub, washed the windows and the walls.  Everything was as spotless as it was going to get.

Then it was time to dress up that squeaky clean lady, I mean, suite.

Color.  I wanted a good neutral that would go with anything and we decided it'd be a good idea to paint both rooms the same for continuity and to help them both seem a little larger.

Enter Dolphin Fin.  

T was a little skeptical, but once we got it on the walls, we were both very happy:
This is probably the most accurate capture of the color.  A lovely, warm grey.


 This one shows the grey vs. the color that was previously on the walls and built ins.

And that is where I'll leave you for today.  Part two to come soon.


Won't You be My Neighbor?

House.  With a capital H.  I bought one.

Let's take a second, or an hour, to absorb that.  I probably should have by now as I closed on May 2nd and have been in it since the end of May.  But it's still so new and almost too big to absorb.

I.bought.a.house.

I am so very lucky to have been able to get into a house in the current Austin market.  I had put 5 offers in, each above asking, and got rejected thanks to those moving into the area with so much cash that they have nothing better to do than go all-in (in cash) and blow all the offers that required financing out of the water.  Luckily, my Realtor wanted to be my neighbor, so he got me into this house before it went on the market, so no competition.  Thank you, KG.

The house is in an interesting state.  I love it in all of its "I'm stuck in the 1950s and I'm proud of it" glory.  And by "love" I mean that I am feverishly changing 90% of the superficial aspects of it.  I'm a big fan of projects and before-and-afters, so this is a match made in house hunting heaven.

Let me show you what I'm working with in its pre-possession glory.


Burglar bars, pink shutters, weird squiggly tree flanking the right side... GLORIOUS.

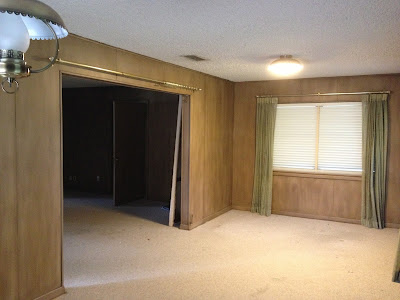
The inside is complete with wood paneling, the original oven/stove in GE Woodtone brown and, last but not least, popcorn ceilings.  Like I said before, I love it.  It's in a great location, it's built really well, it has a floorplan that can work with a few adjustments and it's on a 1/3 acre lot.  Perfection.

I'll leave you with a few more pictures to finish the introductions:

Front door and foyer:


The front living room:


The middle living room looking into the blue room:

The middle living room looking into the kitchen:

The kitchen:

Looking from the kitchen to the back living room/office/dining room:

One side of the back room:

The pink (guest) bathroom:

Back bedroom:

Front bedroom:

Master bedroom:


Master bathroom:

Downstairs to the walkout basement:

Basement:

Basement Bathroom:

Garage:

She's quite the project house, ain't she?  I am honestly a little overwhelmed with the amount of space we have, but there is just so.much.potential.

First project's first... REMOVE THE DEATH TRAP BURGLAR BARS!